

 Buy me a Coffee


Let’s be honest, no monitor is perfect. Even the best screens can suffer from dead pixels, flickering, ghosting, or strange color tints. Many of these issues stay hidden until they hurt your eyes or affect your work. That’s where online monitor testing helps.
With just a few clicks, you can spot problems early and check how your screen performs in real time. These browser-based tests reveal flaws in color, brightness, sharpness, and geometry without needing to install anything. Whether you’ve just unboxed a new monitor or are troubleshooting an older one, these tools help you fine-tune your display or decide if it’s time for a replacement.
Why Run an Online Monitor Test?
From bulky CRTs to today's razor-sharp OLEDs, I can tell you that no display is perfect. Even top-tier monitors degrade over time; colors shift, brightness drops, or ghosting appears. A quick check every few months helps you catch early signs of decline and plan upgrades intelligently.
Bought a new monitor? Test it right away. Many manufacturers allow only a few days for return or exchange in case of defective pixels or backlight bleeding. An online test lets you spot these problems fast and take action.
Many users suffer from fatigue or headaches because of poorly tuned monitors such as too much blue light, improper brightness, or flickering. Usually, they try to adjust brightness, sharpness, contrast, gamma, etc just by guessing it visually. Running a quick test using this online tool can expose these issues and help them make the right adjustments.
What Are Some of the Common Monitor Issues?
Monitor can have a variety of issues. In this section, let’s go through some of the most common issues that usually occur:
1. Dead or Stuck Pixels
Dead pixel: A pixel that remains permanently black.
Stuck pixel: A pixel that remains on (often red, green, or blue).
Cause: Manufacturing defect or long-term pressure/damage.
Solution: Sometimes fixable with pixel massage tools or flashing apps, but often permanent.
2. Backlight Bleeding or Uneven Brightness
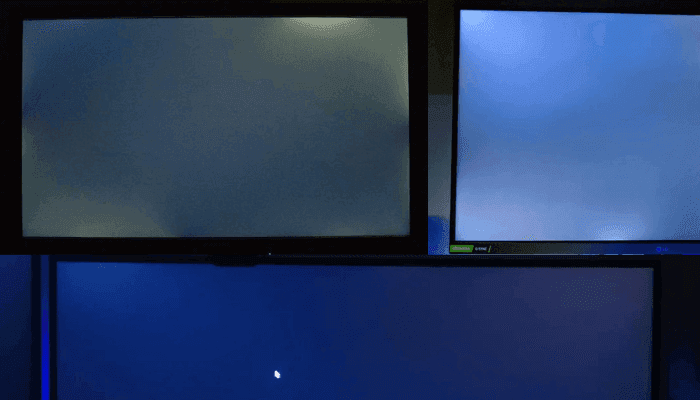
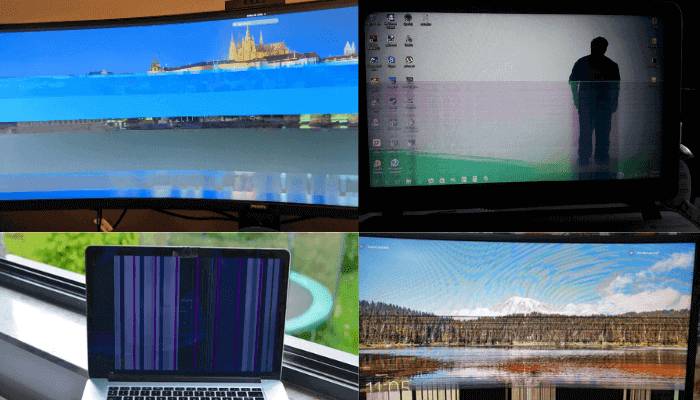
Bright patches of light at the edges or corners of the screen, especially on black backgrounds. It is usually common in IPS panels and cheaper displays. This issue can often be mistaken for poor contrast.
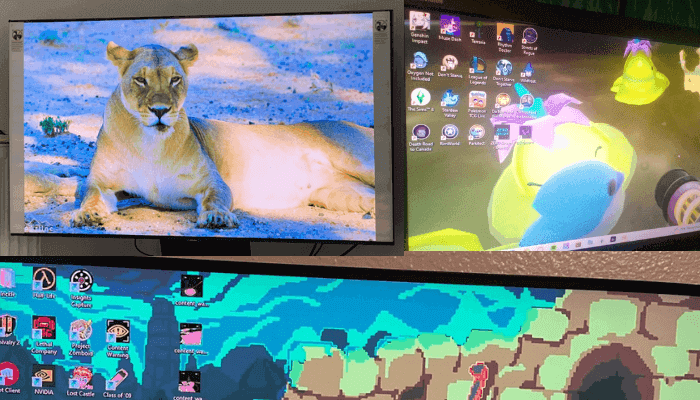
3. Color Banding (Gradient Issues)
Smooth gradients appear as visible bands or lines. It is caused by low color depth, poor calibration, or compression. The color banding issue is more noticeable in gradients and dark areas.
4. Flickering
Constant or intermittent blinking. It can be due to refresh rate mismatches, faulty cables, power issues, or PWM (Pulse-Width Modulation) dimming in LED backlights. The display flickering issue is very common in budget displays or when using adapters.
5. Ghosting or Motion Blur
Trail behind moving objects, especially in fast games or videos. This issue is caused by slow pixel response time or poor overdrive settings. VA panels are more prone to this than IPS or TN.
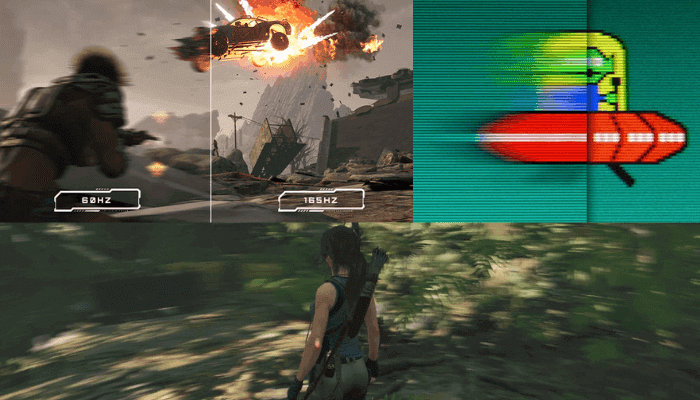
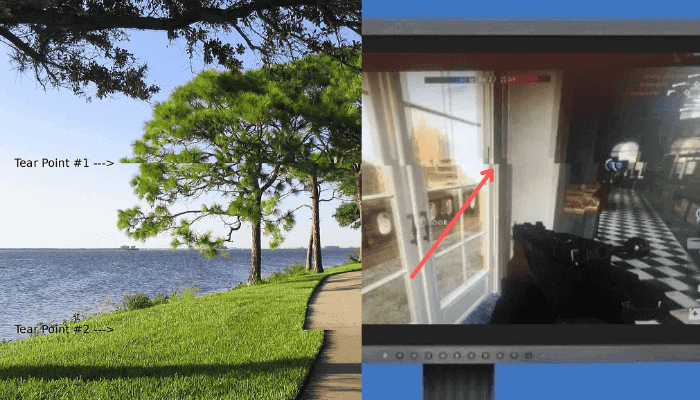
6. Screen Tearing
When a part of the screen refreshes at a different time, causing a “cut” or "tear" effect during motion. Screen tearing issue is caused by mismatch between GPU frame rate and monitor refresh rate. It can be solved with V-Sync, G-Sync, or FreeSync.
7. Incorrect Colors or Tint Issues
Whites appear yellowish, pinkish, or blue. This issue often occurs due to incorrect color temperature, damaged panels, or bad calibration. It can also result from poor software color profiles or OS settings.
8. Distorted or Warped Geometry
Circles appear oval, squares look like rectangles. It is caused by improper aspect ratio settings, overscan, or resolution mismatch. Grid test screens easily reveal these issues.
9. Low Contrast Ratio or Washed Out Image
Blacks look gray, whites look dull. It is mostly common in cheap monitors or miscalibrated displays. This problem is also caused by viewing angles and poor gamma settings.
10. Blurry Text or Poor Sharpness
Text looks soft or has halos. This may be due to wrong resolution, scaling issues, or sharpness settings. It is also common when using HDMI instead of DisplayPort or DVI on some PCs.
11. Overscan or Clipping
Edges of the screen are cut off (taskbar, text, or numbers on test grids). This issue is often an issue with TVs used as monitors or older GPUs. The overscan issue is fixable via GPU control panel or monitor settings (disable overscan).
12. Wrong Resolution or Scaling
Display looks zoomed in or pixelated. It often occurs due to misconfigured OS settings or automatic scaling in macOS or Windows.
How to Use Our Online Monitor Testing Tool
Follow these steps to use our free browser-based monitor testing tool:
Step 1: Prepare Your Testing Environment
Make sure the room is dark or use dim lighting to avoid glare. Clean your screen to remove dust or smudges that could look like screen defects or dead pixels. Set your monitor to its native resolution and use normal brightness. Turn off blue light filters, f.lux, or night mode features for accurate test results.
Step 2: Launch the Monitor Test Tool
Open the tool using a modern browser like Chrome, Firefox, or Edge. Click the full screen icon to remove browser elements and test in full view. This helps you see the patterns more clearly without distractions.
Step 3: Run Through Each Monitor Test
Use the arrow keys or on-screen arrows to move between the different test screens. Our tool offers 13 different monitor tests. You can also scroll your mouse wheel to switch tests. Press the spacebar to hide any on-screen text or overlays. Press the ESC key to exit the test at any time. If you want to navigate between the tests automatically, just turn on the autoplay button. You can also adjust the play speed using a slider.
Step 4: Interpret Testing Results
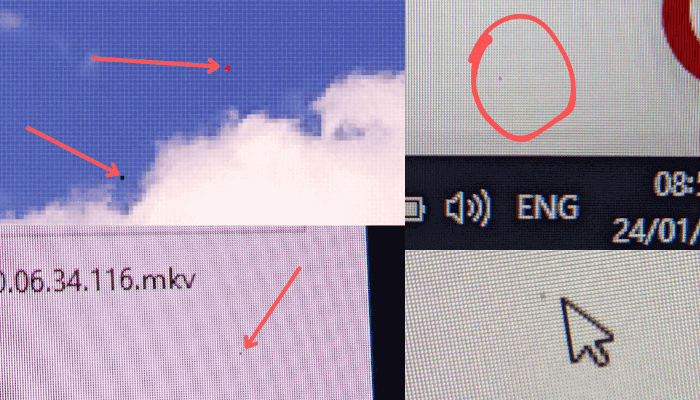
Look for issues like dead pixels, which appear as small black dots that don’t change color. A soft glow in dark areas may suggest backlight bleed. Blurry lines or flickers may indicate a problem with refresh rate or response time. Uneven colors could point to a panel issue or a color profile mismatch.
Step 5: Take Action
If you find problems, make a note, especially if your monitor is still under warranty. Try updating your graphics drivers or recalibrating the screen. You can use pixel repair tools to fix minor stuck pixels. If problems continue, contact support or consider replacing the monitor.
All Tests Available in Our Online Monitor Testing Tool
Our online monitor testing tool includes 13 essential tests designed to check every aspect of your screen’s performance. Here’s a quick overview of what each test does and how it can help you spot common issues.
Color Rendering Test
The Color Rendering Test is designed to evaluate how accurately your display reproduces primary and secondary colors without distortion, tinting, or unwanted blending.
This test pattern displays a set of vibrant vertical color bars, including white, yellow, cyan, green, magenta, red, and blue. These colors help you visually confirm that your monitor is rendering core color channels (RGB) and their combinations correctly and without any visual artifacts.
Colors should be uniform, without any tint, blending, or discoloration. If any color bar looks muted, overly saturated, or uneven, consider resetting your display settings or fine-tuning color temperature and gamma in your monitor's menu.
Modern LCD and OLED monitors typically perform well in this area, but this test is still a useful tool for identifying manufacturing inconsistencies, incorrect color calibration, or aging display issues.
Dead & Stuck Pixel Test
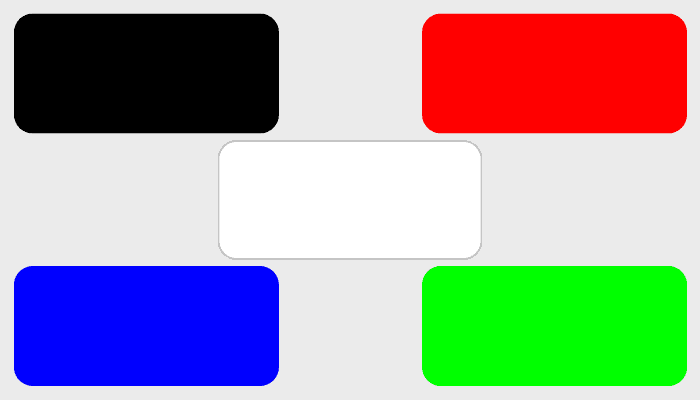
Every pixel on a modern display is made up of three subpixels which are red, green, and blue. These subpixels combine at various intensities to form the full spectrum of colors you see on screen. If one of these subpixels fails to function properly, it results in a defective (or dead) pixel, which can appear as a black, stuck, or discolored dot on the screen.
This test presents full-screen solid colors (black, white, red, green, and blue) each activating only one subpixel channel at a time. It allows you to isolate and inspect individual color components across the display.
While running this test, you will look for the following:
Dead pixels: Black or unlit dots that remain fixed in one position regardless of the color being displayed.
Stuck pixels: Dots that are stuck on one color and do not change with the image.
While a few dead pixels can be considered normal on older screens, new monitors should ideally have none. Some manufacturers have pixel defect policies, so if your display is under warranty and you're seeing issues, consider contacting support.
Gradient Smoothness Test
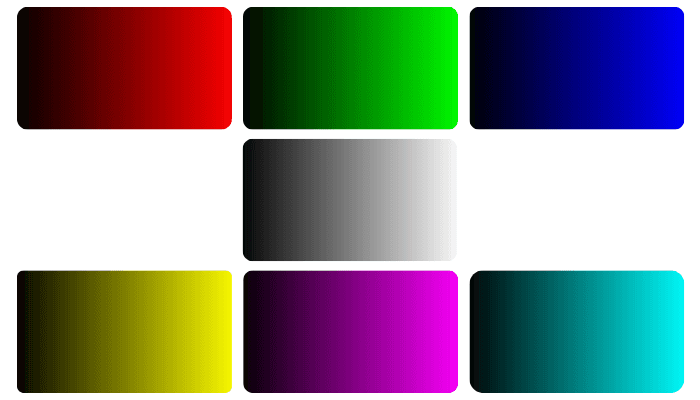
This test evaluates your monitor’s ability to render smooth color transitions. The gradient of red, green, blue, white, yellow, magenta, and cyan should flow seamlessly without visible banding, stripes, or sudden shifts in color. If you notice abrupt lines or patches, it indicates limited color depth, poor panel quality, or incorrect display settings.
Visible banding often occurs on screens with only 6-bit color depth (commonly found in budget TN panels) or when dithering isn’t applied effectively. On a properly calibrated 8-bit or 10-bit display, these transitions will appear perfectly smooth.
To get accurate results, ensure your monitor is set to its native resolution, your system’s color output is at 8-bit or higher, and hardware acceleration is enabled in your browser or OS settings.
Some operating systems or graphics drivers may default to limited RGB ranges, which can reduce gradient accuracy. Switch to “Full RGB” in your display settings for optimal results.
Sharpness Test
This test evaluates how clearly your display renders fine details and edges. Sharpness affects the clarity of borders between light and dark areas. If text appears slightly blurry or lacks crisp edges, your sharpness setting may be too low. Conversely, excessive sharpness can create unnatural halos and distortions.
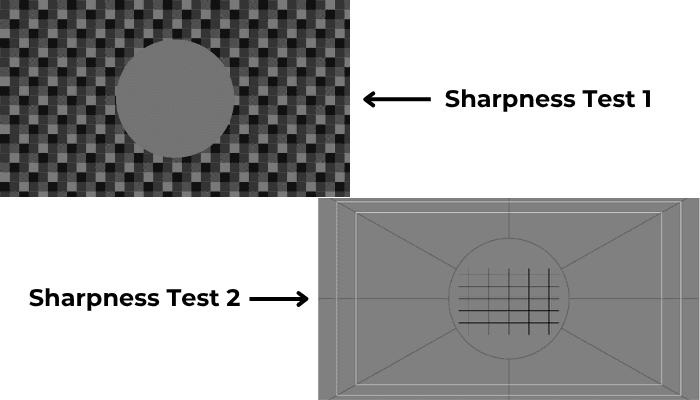
On the first sharpness test pattern, properly adjusted sharpness should reveal clear checkerboard patterns and distinct lines in each square. If the image appears flat or some squares blend into solid gray, sharpness is likely insufficient. The central circle should also remain clearly visible and well-defined.
On the second sharpness test pattern, look for crisp lines and uniform shapes without halos, fuzziness, or jagged edges. Diagonal lines should appear smooth and straight, not stair-stepped or distorted.
There’s no universally “perfect” sharpness level. The ideal setting varies depending on screen resolution, size, viewing distance, and panel type. What matters most is achieving a clean, balanced image without blurring or over-enhancement.
Avoid using digital sharpness enhancements at high levels, especially on text or fine graphics, as they can introduce visual noise or artifacts. Set sharpness to the point where detail is clear, but natural.
Brightness & Contrast Test
Under this test, you will get 4 tools to adjust your monitor’s brightness & contrast level. On the 1st tool, check if each colored block shows distinct inner squares with smooth gradient steps. If any areas blend or vanish, especially in white, red, green, or blue, your brightness or contrast may be off. Adjust settings until all inner patterns are clearly visible.
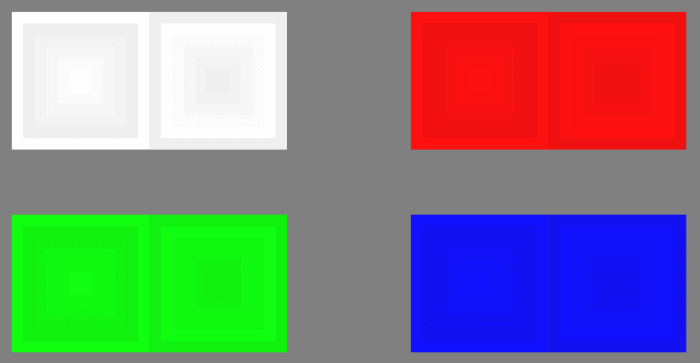
On the 2nd tool, you should see all 32 numbered bars in each gradient from left to right for grayscale, red, green, and blue. If the darkest bars blend into the background or adjacent bars, adjust brightness and contrast until every step is clearly distinguishable.
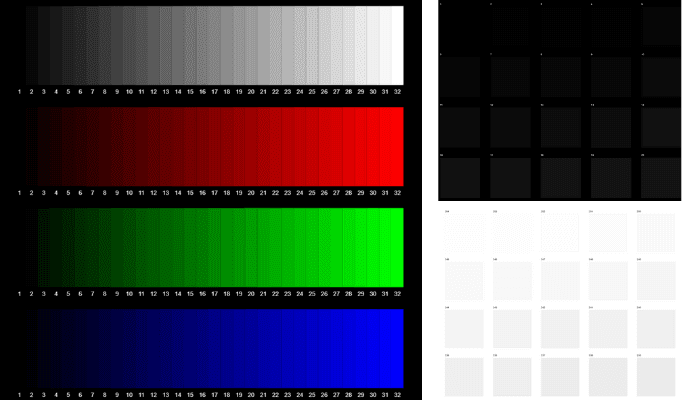
Using the 3rd tool, test your monitor’s ability to distinguish bright shades near pure white.Each box is labeled with a brightness value from 254 down to 235. You should be able to see faint differences between each square. If the top rows look identical or washed out, lower your brightness or adjust contrast until all boxes become distinguishable.
And using the 4th tool, test your display's ability to show dark shades near true black. Each box is numbered from 1 to 20, increasing in brightness. Ideally, you should be able to see all boxes as separate tones. If the first few boxes blend into the background, raise your monitor’s brightness or reduce contrast until each square becomes distinguishable.
A well-calibrated monitor will display equal and distinct brightness transitions in every color block, maintaining full detail in both dark and light areas.
Zonal Brightness Test
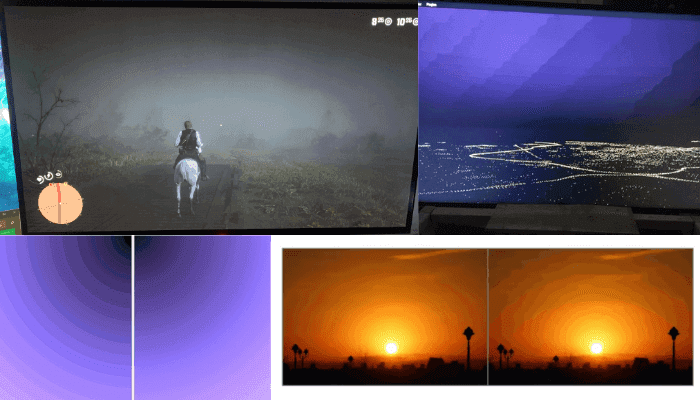
This test is designed to evaluate how evenly your monitor reproduces brightness across the entire display area. The pattern consists of concentric rings that help reveal inconsistencies in luminance and uniformity.
On this concentric ring pattern, check for smooth, even brightness from center to edges. Rings should stay circular and evenly spaced. Distortion, dark corners, or phantom rings suggest issues with uniformity, geometry, or backlighting. A consistent display indicates proper luminance performance.
The center of the image should appear smooth and well-defined. As your eyes move outward toward the edges, the rings should gradually become sharper and more distinct. If everything looks uniform and consistent, your display is performing well.
However, if the rings appear distorted such as becoming oval-shaped or irregular, it may indicate issues with the screen’s geometry or backlight uniformity. Also, watch for false patterns or "phantom" circles near the edges, which suggest uneven brightness distribution.
Pay attention to the screen corners. A slight drop in brightness there is common and usually acceptable, but large darkening or visible merging of contours indicates poor brightness zoning.
Gamma Test
The Gamma test helps you determine and fine-tune your monitor’s gamma value, which directly affects image brightness, contrast, and shadow detail accuracy.
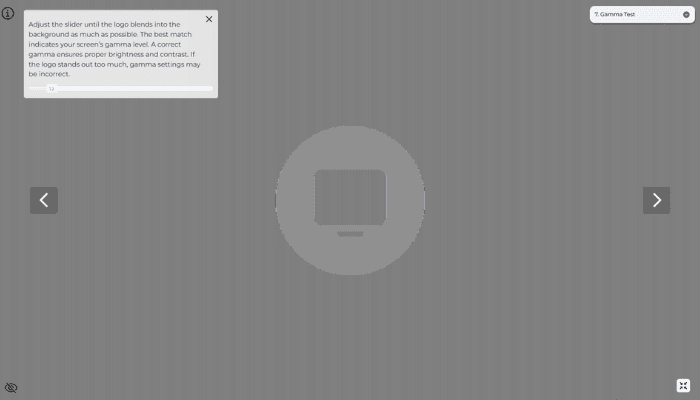
In this test, a grayscale logo is displayed against a vertically striped background. You adjust the gamma level using the slider until the logo visually blends into the background as much as possible. When the blending is optimal, the displayed gamma value closely matches your monitor’s actual gamma response.
This test is essential for content creators, designers, and gamers who require accurate on-screen tonal reproduction. A proper gamma setting ensures that images appear consistent across different screens and that dark and light areas are rendered with the correct depth and nuance. Most monitors target a gamma of 2.2, but adjustments may vary based on specific use cases or preferences.
Ghosting & Motion Blur Test
This tool is designed to identify monitor ghosting, inverse ghosting, and motion blur issues. Ghosting occurs when pixels fail to change quickly enough between frames, causing a trail or shadow to follow moving objects. This is often due to slow response times in LCD panels.
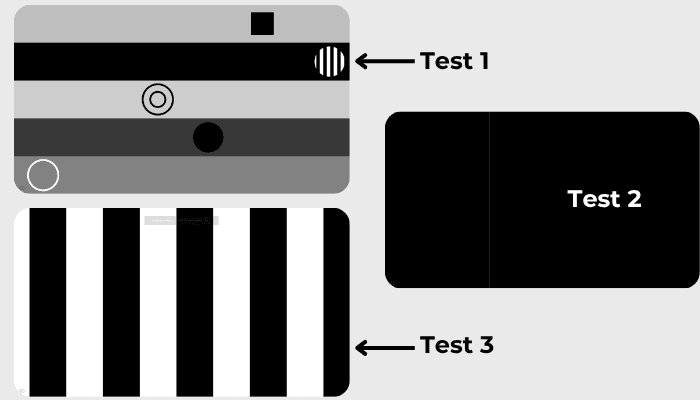
On test 1, watch the moving shapes closely. If you see a trail or shadow following them, it means ghosting. If there is a bright or dark glow around the shapes, that is called inverse ghosting. If the shapes look soft or blurry while moving, that is motion blur.
If you see ghosting, try turning on a setting called "overdrive" or "response time" in your monitor menu. For inverse ghosting, lower the overdrive level if it's already on. If the shapes look blurry, check if your screen is using the highest refresh rate available in your settings. If these do not help, the problem may be a limit of the screen itself.
On test 2, a single white line moves slowly across the display. If the screen is working correctly, the line will move smoothly. If you see the line jump, shake, or break apart, your screen may have a refresh issue or screen tearing.
On test 3, black and white vertical bars move left and right at different speeds. If your screen works properly, the bars will stay sharp and smooth. If you notice flickering, blurry edges, or trails following the bars, it means your display has issues like flicker, ghosting, or motion blur.
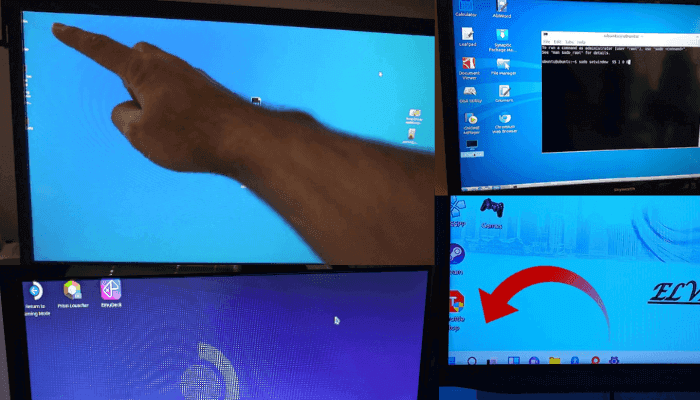
Viewing Angle Test
The viewing angle test is designed to evaluate how well a screen maintains image integrity when viewed from different angles. This test is applicable to TVs, monitors, tablets, smartphones, and any other display devices.
It shows patterns of circles that should ideally retain their shape, size, and brightness regardless of the angle from which they are viewed. As you from an angle (near to 180 degrees is recommended), a high-quality display will show minimal distortion or fading, indicating superior viewing angle stability. In contrast, inferior screens may show significant shape distortion, brightness drop-off, or color shifting.
Shape Accuracy Test
This test is used to verify the correct geometry and alignment of the image displayed by your monitor. The grid pattern helps identify issues such as image stretching, warping, or uneven scaling. Straight horizontal and vertical lines should appear consistent and evenly spaced across the entire screen.
If lines curve or appear distorted near the edges, it may indicate a problem with the display’s aspect ratio, resolution settings, or internal scaling. This test is particularly useful for detecting subtle shape distortions that may not be visible during normal use.
Image Clipping Test
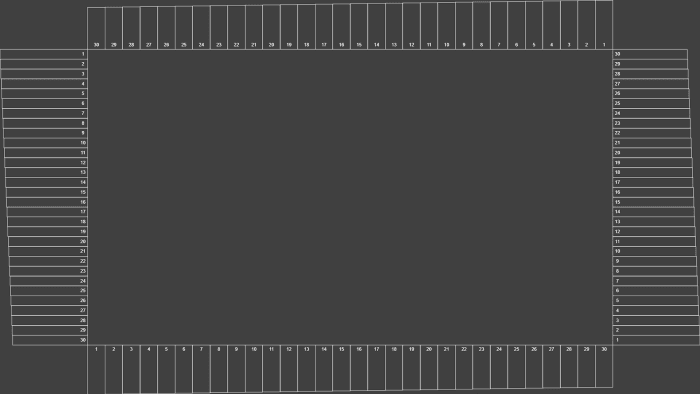
This test checks whether your display is showing the entire image area sent from the graphics card. A correctly configured monitor will display all numbered rectangles around the border, each with a visible white outline. If any rectangles are missing or partially hidden, the image is being clipped. It is due to overscan settings on the display.
This is common on TVs and some monitors when overscan is enabled by default. The number on any missing rectangle indicates how many pixels are being cut off on that side. Adjust the display settings (such as “Full,” “Just Scan,” or “1:1”) to correct the image and ensure no visual information is lost.
Aspect Ratio Test
This test is made for widescreen displays (16 : 9). You should count 16 equal squares across and 9 equal squares down. There’s a circle in each corner and a big one in the middle; all five circles must look round, not stretched. If the circles look like ovals or the grid is cut off, pick the correct 16 : 9 resolution (for example, 1920 × 1080) in your settings, or turn off any scaling options that change the picture shape.
VGA Clock & Phase Test

This test is designed to help optimize VGA monitor settings, specifically the clock and phase parameters. When viewed from a distance, the patterns should appear as uniform gray. However, up close, a fine checkerboard grid of alternating black and white pixels should be distinctly visible.
If the image appears blurry, flickers, or seems to "crawl" with moving noise (known as running pixels), the synchronization is not properly configured. Similarly, if the pattern appears as a solid gray with no visible pixel structure, or if you see unusual vertical lines or curves, adjustments are required.
On many monitors, especially older VGA models, the clock and phase settings can be adjusted manually through the on-screen display (OSD). Modern monitors often offer an "Auto" or "AutoSet" function that can detect and correct these issues automatically.
This test is mainly relevant for analog signal inputs (like VGA). Digital interfaces such as HDMI, DisplayPort, or DVI typically handle synchronization automatically and do not require these manual adjustments.
What Are the Characteristics of a Perfect Monitor?
While no monitor is truly "perfect" for everyone, there are universal characteristics that you can look for:
1. Accurate Color Reproduction
A perfect monitor displays true-to-life colors with uniform saturation and no color shift across the screen. Look for high color gamut coverage (sRGB, AdobeRGB, DCI-P3), good factory calibration, and smooth gradients (no banding).
2. No Dead Pixels or Artifacts
Every pixel counts. A perfect monitor has zero dead or stuck pixels, no flickering, and no visual artifacts (like ghosting or color bleeding).
3. Uniform Brightness & Contrast
Brightness should be even across the panel. Not brighter in the center or dimmer at the corners. The contrast ratio should deliver deep blacks and clear whites, with excellent readability in both bright and dark scenes.
4. Sharpness Without Over Processing
The image must be crisp, text should look clean, and diagonal lines should be sharp and smooth, without halos or jagged edges. A proper balance between sharpness and clarity avoids artificial edge enhancements.
5. Stable Refresh and No Flicker
Whether it’s a 60Hz office monitor or a 240Hz gaming screen, it should have stable refresh rates with no visible flicker. Modern panels should also have low input lag and high pixel response for motion clarity.
6. Good Viewing Angles
A great monitor maintains consistent brightness and color when viewed from different angles. IPS and OLED displays tend to excel here, unlike older TN panels that suffer from color inversion.
7. Correct Geometry and Scaling
No stretching, warping, or image clipping. Shapes should remain accurate (especially circles and grids), and aspect ratios must be properly handled. A test grid can reveal geometry issues instantly.
8. Long-Term Reliability
Finally, a perfect monitor stands the test of time with minimal burn-in risk, color stability over the years, and durable components. This is where build quality and brand reputation truly matter.
Tips for Accurate Monitor Testing
Test in a dark or dimly lit environment to minimize glare and ambient color interference.
Disable any blue light filters, night mode, or apps like f.lux to see true colors and contrast.
Reset your monitor to factory color and sharpness settings for baseline accuracy.
Some display issues may vary by browser. Switch browsers if you see inconsistent results.
Ensure that your graphics drivers are updated for best compatibility and performance.
Conclusion
Monitor problems can lower display quality and affect daily use. Dead pixels, ghosting, color banding, or incorrect scaling often point to hardware flaws or bad settings. With the help of online test patterns, you can check your monitor’s performance quickly. Each test focuses on one area, making it easy to find and fix specific issues. Regular testing ensures that colors look right, shapes stay accurate, and motion stays smooth. For the best results, always use the monitor’s native resolution and proper calibration. This keeps your screen sharp, balanced, and reliable.